Here is one I finished, but haven't framed yet.
I've been meaning to do a post about cross stitching for quite some time. So since I only started this kit on Friday, this is the perfect time to take you through how to start one of your own.
I've been cross stitching since my mother got me interested in it when I was about 10 years old.
She is the queen......as you can see from this one she did from a picture of my son. She has cross-stitched pictures of all the grandchildren and is now on to the great-grandchildren. I still haven't tried one of these, but I plan to in the future.
You send a picture in to this company and then they send it back to you as a pattern. If you're interested here is the address: Creative Vision Design, PO Box 600, South Barre, MA 01074-0600. The phone number is 866-459-7862.
You will need:
Scissors
Hoop - to keep cloth tight
Highlighter - to mark the areas you have finished
Large safety pins - to help hold cloth
Gallon size zip lock bag - to store your kit and materials (especially if you have cats, like I do, that like to play with string....)
Tape - to keep the cloth's edges from fraying. A lot of people stitch the edges, but I think the tape is easier and takes less time.
Kit - I buy from THE STITCHERY magazine. The kit usually runs me around $35. Buy something simple and small when you're starting out. The preprinted X-stitch are much easier then the non-printed ones.
Look for a kit that says 14 count or less. That means there are 14 X's per inch. The kits come with the floss, pattern (directions), cloth and a needle. I like to buy kits with DMC floss that way if I run out I can get more at my local cloth store. I've also bought books with patterns in them (like for Christmas stockings), but then you have to buy your own cloth and DMC floss and a storage container. As you get better at it, try a kit that says 16 count or even 21 count. There are more X's per inch and you may need a magnifier to help you because the X's and holes are VERY TINY.
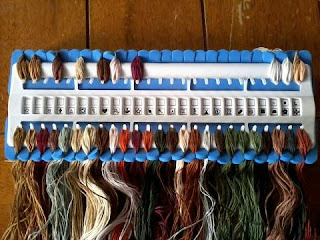
Floss organizer - There are many different versions of this, but this is my favorite one, especially if you buy kits. It comes with a large pack of the paper strips to code your kit and the spongy material keeps the floss neat and organized.
Start by organizing your floss so you know what colors you have and what symbol they go with on the pattern.
I store most of my floss on the organizer, but if a color or two has a huge amount I keep those in the zip lock for later.
Second, you will need to tape the edges of your cloth to prevent fraying. Before you block and frame your piece you'll pull this tape off.
Now to find the center of the cloth, fold it in half twice. This is where you will start stitching. I usually poke a pin in here to hold my place until I start. Then put the hoop around your work and tighten.
I then roll the sides of my cloth in tighter and pin it so it is easier to hold.
On the pattern find the top and side arrows and follow then to the center. Find the symbol and color of floss you will need. Read the directions to see how many strands of floss your kit calls for. Usually you will be using two strands at a time. If there is any outlining you do that last, once all the X's are done and that usually calls for 1 strand.
Start working your X's so that all bottom stitches go in one directions, like this: / / / / / / / / then you will go the opposite direction with all the top stitches, like this: \ \ \ \ \ \ \ \ \ . This gives it a clean, smooth appearance.
After starting in the middle, I work my way to one side and up to the top so I know how large it will be. Then I start working my way across and down until I finish.
When you are done you can either block(*) and frame your own piece or take it to a framing store, like Hobby Lobby, and they can do it for you. I have done both.
* To BLOCK you own piece you should place it face down on another clean dry white towel and pressed on the reverse side using a wet cloth and the iron should be set at a medium heat. Continue pressing the piece until it is completely dry and wrinkle free. If you have cross stitched a heavy material, you may need to use the steam setting on your iron to remove the creases but as long as you use a pressing cloth, the heat from the steam will not damage the cross stitch or any beading you have worked into your pattern. You are now ready to frame your work.
I HOPE THIS WAS HELPFUL AND YOU TRY ONE YOURSELF!


2 comments:
I loved cross stitching when I was younger. I have been meaning to start a blanket for Tony's Mom for Christmas, but just haven't found the time.
Love the frogs!!!
As an experienced stitcher I didn't think I would learn anything from this, but I did! The floss organiser is wonderful, I've found one online that I want so I just have to save up and but it, thank you!
~ComaStitch
Post a Comment